The Telehealth Back Office (or "Waiting Room") permits ICANotes users to manage clients waiting to be seen by their provider, as well as have quick and easy access to additional ICANotes resources including the Patient Portal, Upload Site, Knowledge Base and more. For optimum performance, we strongly encourage the use of Google Chrome to login to the Back Office.
ICANotes users must be enabled for Telehealth in order to login to the Back Office site. In addition, a group rule must be enabled by the Security Administrator. Contact ICANotes Support at ticket@icanotes.com to inquire about enabling the Back Office for your account. (How to enable Telehealth for a user is included in the FAQ section of this article)
This knowledge base article is broken down into the following categories:
- Logging In
- Using The Back Office
- Back Office Functions
- Waiting Room
- Communicating With Staff
- Frequently Asked Questions
Logging In:
To access the Browser Based Back Office, navigate in the Chrome browser to https://telehealth.icanotes.com and login with your ICANotes credentials. This window may be left open and used simultaneously with your regular ICANotes login.
Login with your credentials. Please note: Only one login per username is permitted; the Back Office cannot be open in multiple tabs/windows or devices with the same username at the same time.
Using The Back Office:
This segment will outline each function of the Back office. Additional detail will be given further on in the guide.
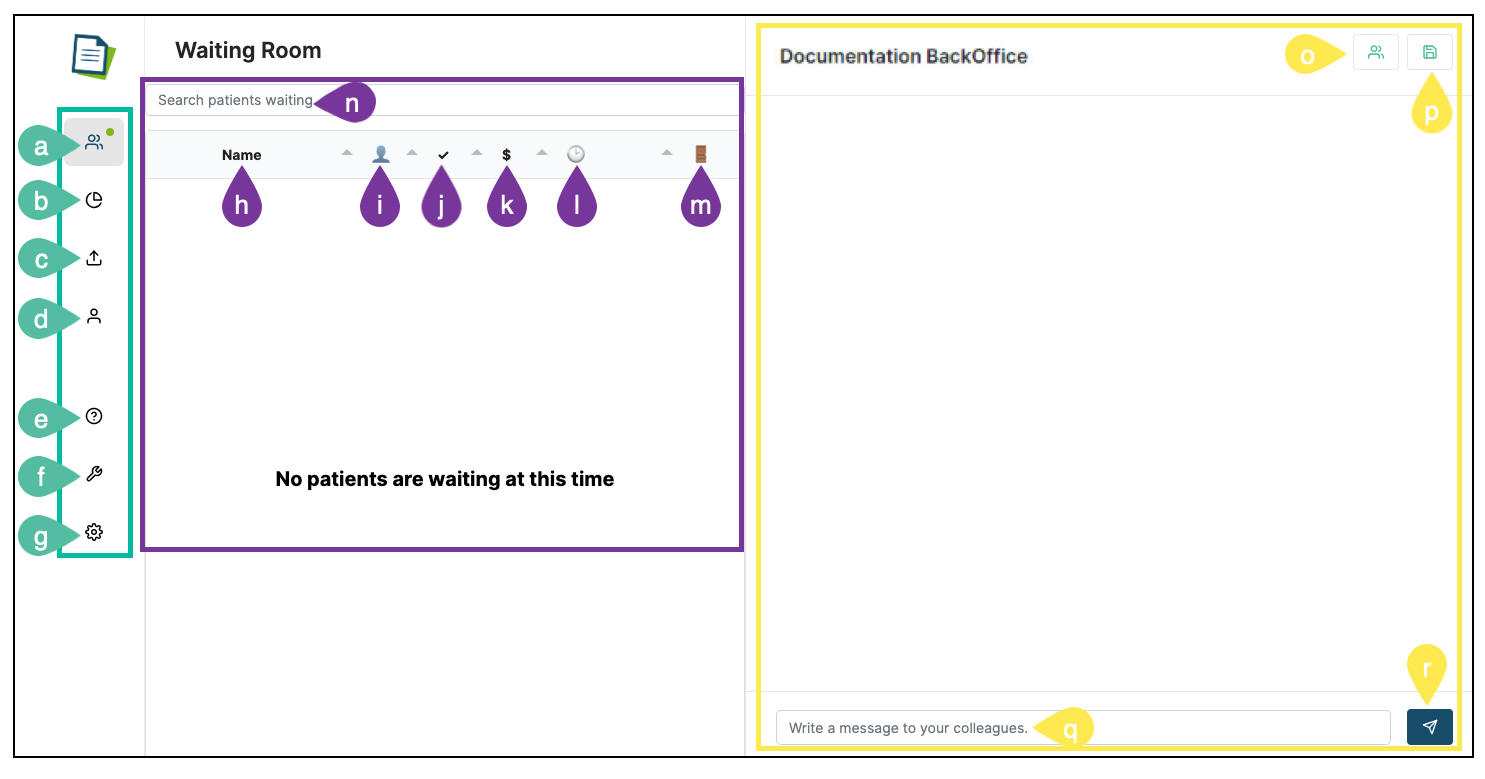
On the left-hand side of the Back Office you will see a navigation menu with the following options:
a. Back Office - Click to return to the main Back Office view from anywhere in the site.
b. Reporting - View data related to client attendance, session duration (date, start/end time), invite type, and if a copay was collected.
c. Upload Site - This option will open the Upload Site (https://upload.icanotes.com) within the Back Office window. The site can be minimized for continued use later - without having to navigate to another tab/window. d. Patient Portal - This option will open the administrative user login to the Patient Portal (https://patientonlineportal.com) within the Back Office window. The site can be minimized for continued use later - without having to navigate to another tab/window. e. Help Center - Access the Feature Tour, our robust Knowledge Base, and Video Tutorials. (The Knowledge Base and Video Tutorials are also available at https://www.icanotes.com/support/)
f. Tools - Click to access an internal Speed Test to check your current internet connection, or Webcam Check to test your current webcam settings.
g. Settings - Send a Patient QuickVite, get the Waitroom External Join codes which provides you with a link to access the Telehelath virtual waiting room from your practice website, or Logout of the Back office.
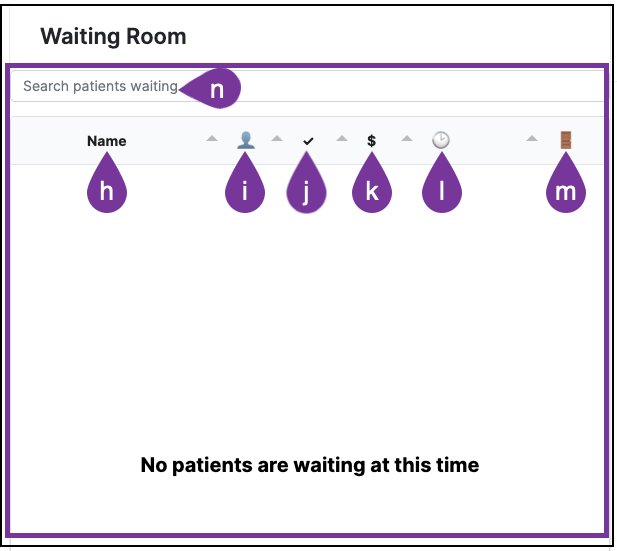
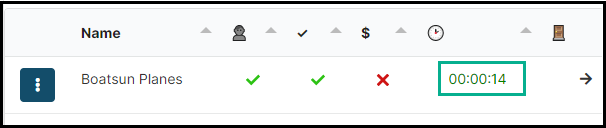
Along the top of the window in the next section, you will see information about patients in the Waiting Room:
h. Name - The name of the patient will be displayed.
i. Status - Click on the red X to change it to a green check when the patient arrives to indicate that they are in the Waiting Room.
j. Checked In - Click on the red X to change it to a green check when the patient has been checked in.
k. Copay - Click on the ted X to change it to a green check when the Copay has been collected from the patient.
l. Time - Shows the total time since the session was created.
m. Enter - Click on the arrow in this column to enter the room with the patient.
n. Search Patients - Search the list of waiting patients.
On the right-hand side of the Back Office, you can send messages to colleagues:
o. Colleagues Online - Click this icon to show your colleagues that are currently online in the Back Office.
p. Save Chat History - Click on this icon to save your Chat History.
q. Write A Message - Enter text to send to a colleague.
r. Send A Message - Click here to send your message.
Back Office Functions (a-g):
This segment will cover each of the functions available along the left-hand side of the Back Office window in detail.
Back Office (a): Click this button to return to the Back Office screen.
Session Reports (b): To view reports about telehealth sessions, click the Reporting icon (b) located in the left-hand menu.
The Session Report contains specific column headers you can utilize to sort reporting data. Click the Save icon in the top right corner to export the report in Excel (.xlsx) format.
If you would like to be able to view the Join, Start and End times or the Duration of a session, you can access this information by clicking on the Magnifying Glass icon.
Each session has a unique ID that will be displayed when the magnifying glass is clicked on. You can save the Audit Log by clicking on the Save Icon.
Click on the blue BackOffice button to return:

Upload Site and Patient Portal (c&d): Each of these features open within the Back Office window, meaning you do not need to navigate to a separate browser tab or window in order to access them. Note that when accessing either the Upload Site or Patient Portal Admin login from within the Back Office, you will be required to login to each respective site with your ICANotes credentials. You will not be auto-logged in by virtue of being logged into the Back Office.
Upload Site (after login)
Patient Portal Admin login screen
Each site can be minimized by clicking the Minimize icon which will situate the resource at the bottom left of the window for easy access.
Use the Maximize icon to re-load the internal window for the chosen site, or the Close icon to close it.
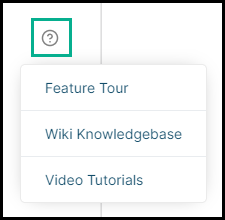
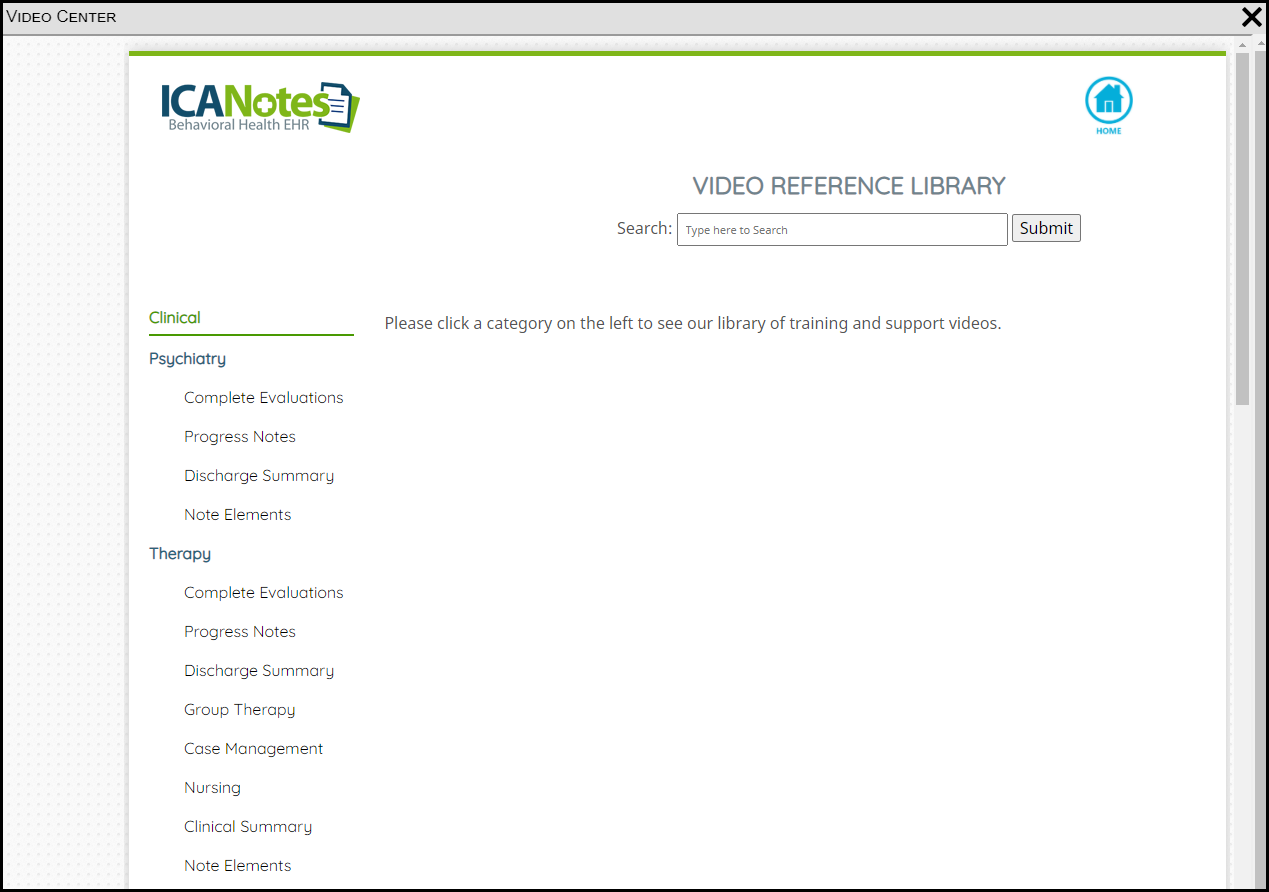
Help Center (e): The Help Center will allow you to revisit the Feature Tour encountered when you logged in for the first time, the Knowledge Base and Video Tutorials.
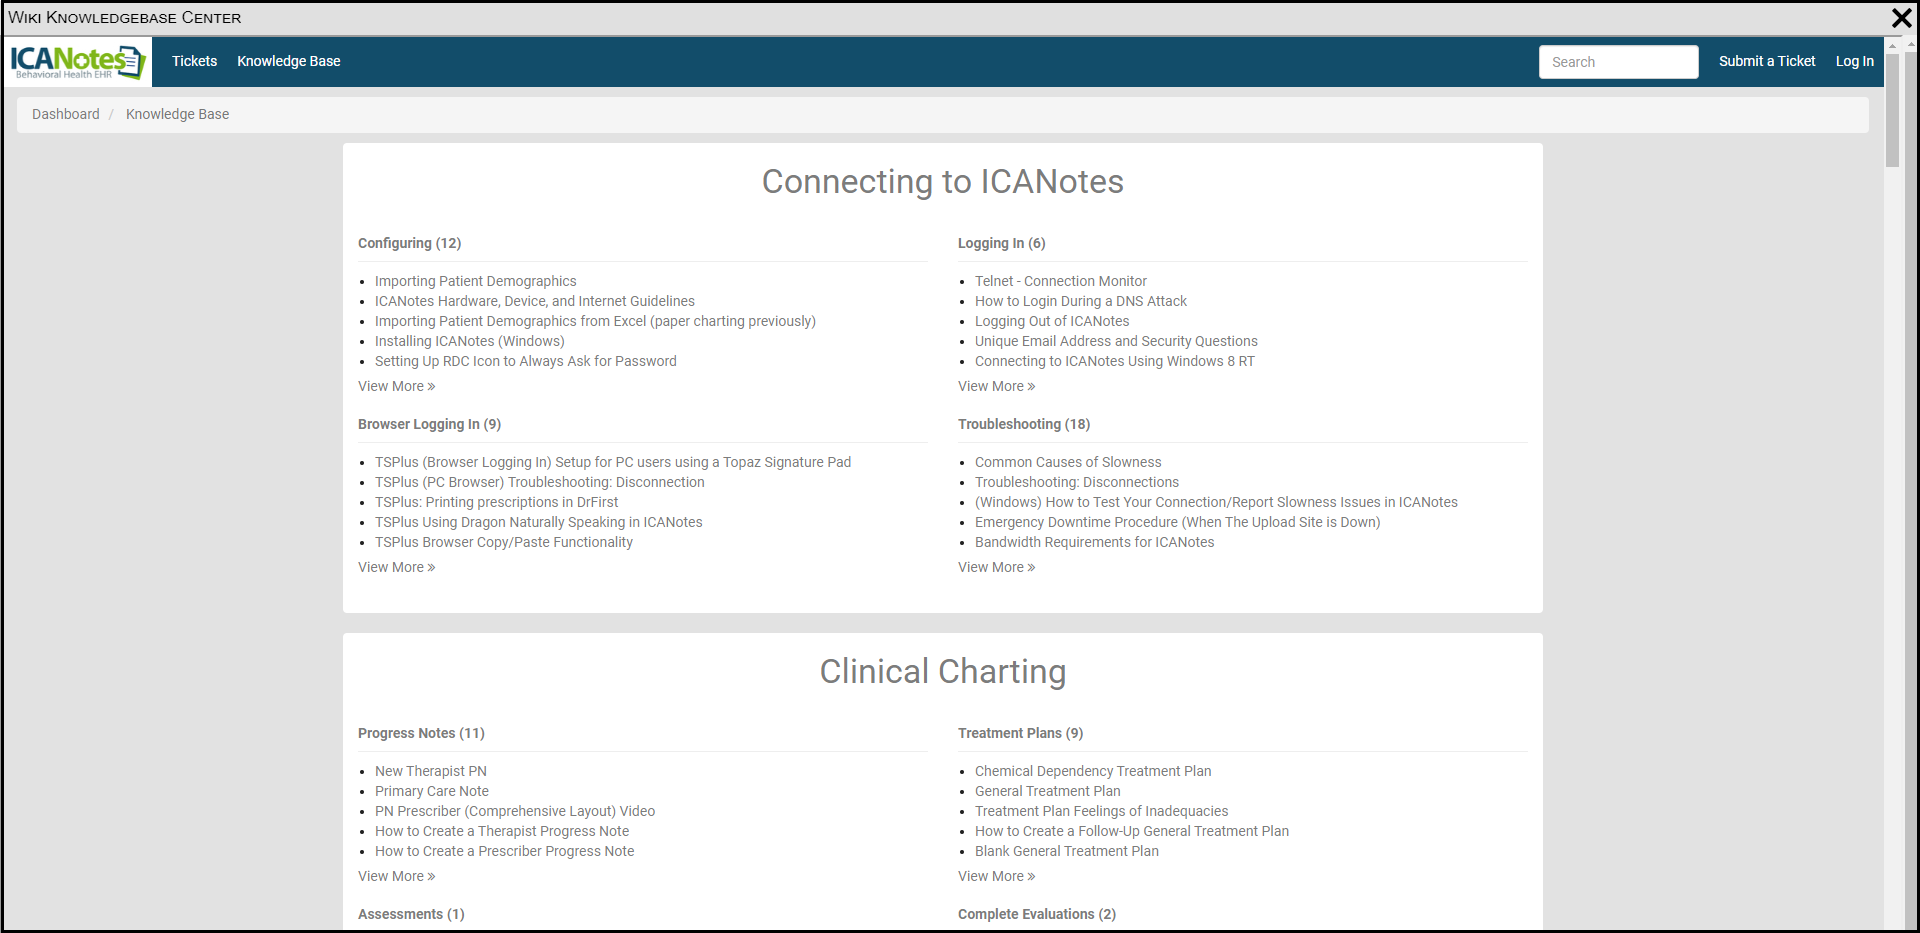
Wiki Knowledge base will open the same Knowledge Base available on our Support page. You can search by keyword or scroll through the categories listed. Click the Close icon in the upper right corner of the Wiki Knowledgebase Center window to close.
The Video Tutorials link will open the same Video Reference Library available on our Support page. Click the Close Icon in the upper right corner of the Video Tutorials window to close.
Tools (f): Click the Tools menu to access a Speed Test and Webcam Check. Both utilities will display as an internal window within the site, meaning you do not have to navigate away from the Waiting Room in order to check your settings.
To check your current connection settings, click to access the Speed Test, then the Start button to begin the test.
Should you need to cancel the speed test as it is in progress, click the Abort button.
Once the speed test has concluded it will display your current connection's Download and Upload speeds, as well as Ping and Jitter. Click the Close icon located at the top right to close and return to the Back Office.
To check your webcam settings, choose the Webcam Check option from the Tools menu.
Follow the on-screen instructions by first clicking in the center of the green screen to grant permissions to use your webcam and audio.
Click Allow to grant access to both.
Next, you'll click the record icon in the bottom left corner of the green screen to record short 10 second clip of yourself using your webcam and audio. Click the record button again to stop.
Click the Play icon to playback your 10-second recording. You should see and hear yourself.
Once you are satisfied with your configuration, click the Close icon located at the top right of the internal window to return to the Back Office.
Settings (g):
Click the Settings menu to access Patient QuickVite, external join codes, or to Logout from the Back Office.
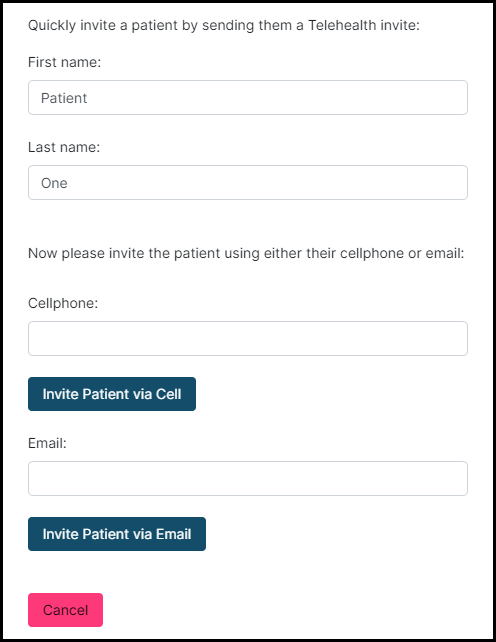
The Patient Quickvite option will provide you with an opportunity to send a telehealth invitation link to a client without having to leave the Back Office. Once you click the option you will see the following screen:
Enter the client's First and Last Name, then enter either their mobile phone number or email address and click the appropriate button to Invite Patient via Cell or Invite Patient via Email.
Please Note: When entering patient phone numbers, do not use any special characters. This can cause the Telehealth invitation to fail to send.
You'll see a brief notification appear in the bottom corner of your screen affirming the Quickvite invitation has been sent.
Example of invitation sent via Cell
Example of invitation sent via Email
Copy the URL to provide a link clients can use to join the virtual waiting room for a Telehealth session. This can be linked on a website or sent in an email, for example. Copy the Button code to embed a button on your website that clients can click on to join the virtual waiting room for a Telehealth session.
When finished, click the Close icon at the top right of the internal window to return to the previous screen.
When the unique link is accessed by the client, they will be presented with three steps before entering the virtual waiting room.
Step 1: Enter Information - First Name, Last Name, Date of Birth
Step 2: Contact Details - Cell Phone Number, Email Address (both are optional)
Step 3: Verify details, and enter exam room
From any step the client may click the Previous button to correct previously-entered information. When on Step 3, if all entered information looks correct, the client will click to Enter Room.
Waiting Room (h-n):
The Waiting Room allows users to view active and waiting sessions for the practice.
When clients join the virtual waiting room to await a Telehealth session, they will appear in an itemized listing onscreen (h):
To see who is already in the session with the client, click the menu icon located to the left of the client's name and choose the option to View Participants.
You'll see a pop-up indicating all individuals currently in the session - clients and staff members/providers included - and whether their microphone and webcam settings are currently enabled/in use.
Click Close to close the pop-up and return to the Back Office.
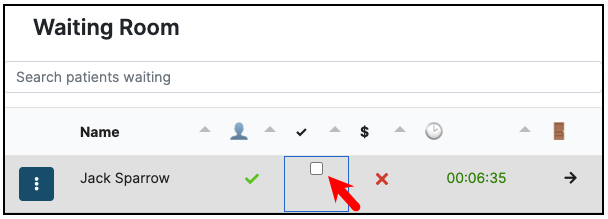
When the client clicks on the link to join the session, the Status (i), will change from a red X to a green check.
To change Checked In (j) or Copay (k) indicators from red X's to green checks, click on the indicator. You will see a check box populate. Click in the box to change a red X to a green check.
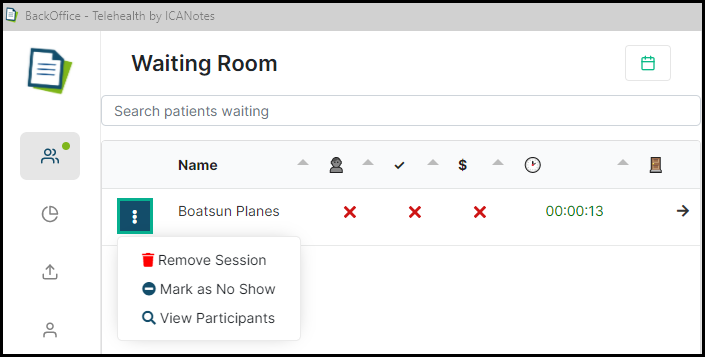
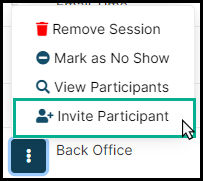
Clicking on the blue button with three vertical dots will populate additional options for the session. From here you can remove the session, indicate if a patient was a no show, and view participants.
When you change a Status, Check In or Collect a Copay, you will see a brief system alert.

The time since the invitation was sent (l) will populate after the Status, Check In and Copay, but before the option to enter the room.
Entering the Room (m):
Clicking on the arrow (located under the door icon) will allow you to enter the room with the client.
Doing so as a staff member will not impede the clinician's ability to connect to the client once they are ready to commence the telehealth session. Use this option to quickly connect with the client in order to share information, collect a copay, or otherwise communicate - such as via Secure Chat. Likewise, providers will use this option to enter the room and conduct the telehealth session.
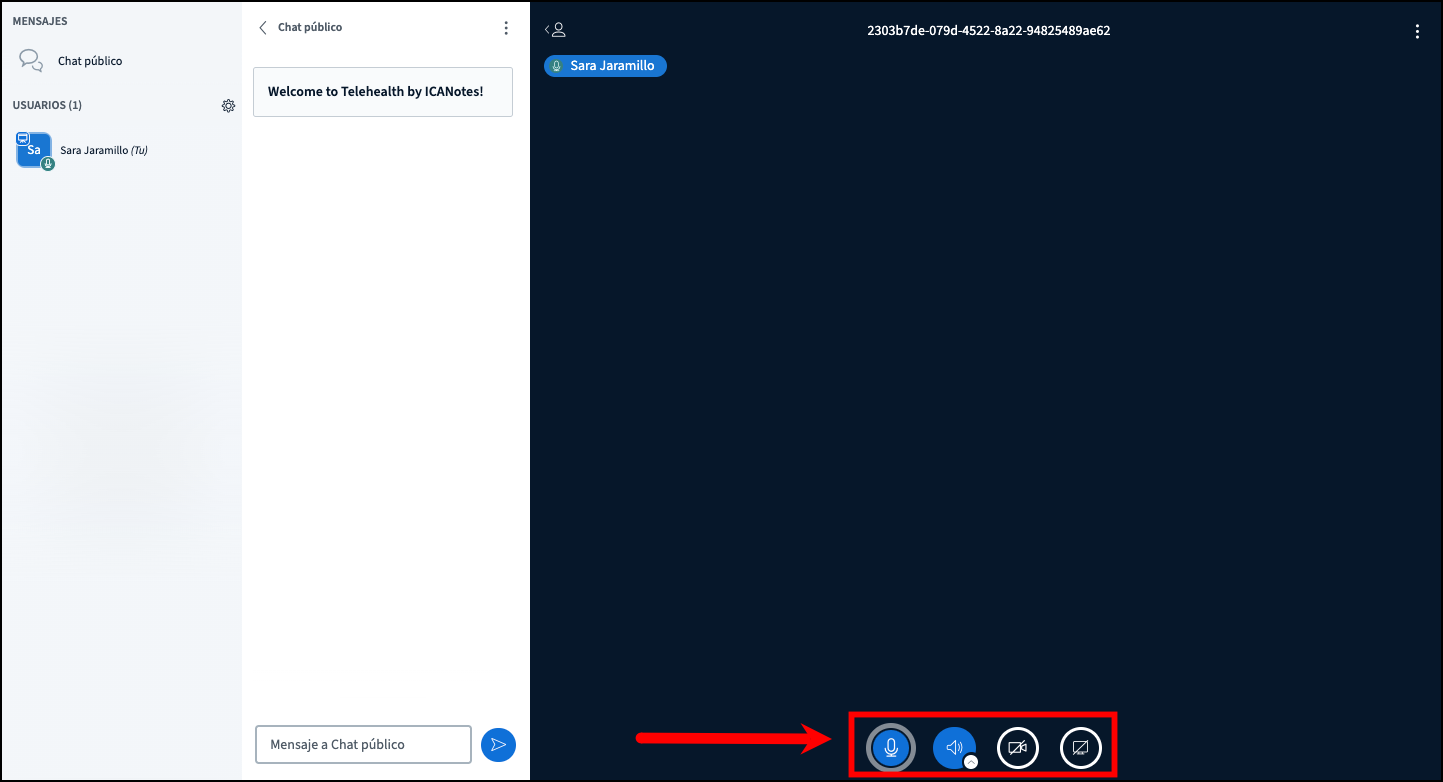
The icons located at the bottom of the room will allow you to Join Audio, Share Webcam, and Share Your Screen. As you click to enable, you may receive a prompt asking you to share your microphone or camera. Click Allow to permit the use, or Block to prevent.
The Share Your Screen option will permit you to choose whether share your entire screen, an application window, or a Chrome tab. Once you click the button you will be presented with the following options:
Your Entire Screen (if you have multiple monitors, each will be presented as a separate screen):
Application Window (choose from among open programs on your device):
NW.js Tab will share your Back Office Window. This is not recommended if you are using the App.
If you are using the Browser Login method, you will have a Chrome Tab.
Chrome Tab (choose from among your open tabs in Chrome):
Click to select an option, then click Share. You will see your chosen selection displayed within the room:
You will have the option to make the shared screen full screen or keep your client in view, as shown above.
Your client will see your chosen selection on their device. If you're sharing your entire screen, for example, the client will be able to see any interactions you make within that screen, such as if you open a program on that screen.
Clients will not initially see the option to Share Your Screen. However, staff members/providers may give clients this permission by making them a presenter. This function is only present if the client is using a laptop or desktop computer rather than a mobile device.
To make the client the presenter of the session, click on their name in the left-hand column and choose the 'Make presenter' option.
The client will now have an additional icon in the bottom center of their telehealth session to choose to share their screen with the staff member or provider. Clicking this new icon will give the client the same sharing options as presented to the staff member/provider above.
To revoke presenter access from the client and return it to the staff member or provider, click on your own name within the User panel on the left and select the Take presenter option.
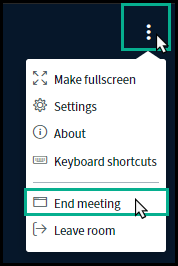
Click into the Options menu located at the top right of the screen to view additional options to Make Fullscreen, access Settings, view About information, Keyboard Shortcuts, End Meeting and Leave Room.
Choose Leave Room to return to the Back Office. This will not disconnect the client from the virtual waiting room and they will continue to wait for their Clinician to arrive.
Choosing the End Meeting option will terminate the session for both the staff member and the client. The following prompt will warn the staff member that doing so will permanently close the session.
The client will be notified that the session has ended and will be taken to a standard 'thank you' page.
Once the telehealth session has been terminated (via the 'End Session' option), staff/provider will need to remove the client's name from the Waiting Room window in the Back Office. Sessions which have been terminated will not automatically fall off the Waiting Room list.
Click the menu icon located to the left of the client's name in the Waiting Room section, then choose Remove Session.
This workflow is to give each practice the flexibility to decide when to reconcile the Waiting Room listing. Once the session has ended, neither staff nor the provider will be able to enter the room again. This will be indicated to the far right of the client's name under the door icon:
While the arrow icon indicates that staff or a provider may enter the room, the closed circle icon indicates the room may no longer be entered. If an attempt is made to enter a room whose session has been ended, the user will receive the following notification in the bottom corner of the Back Office site:
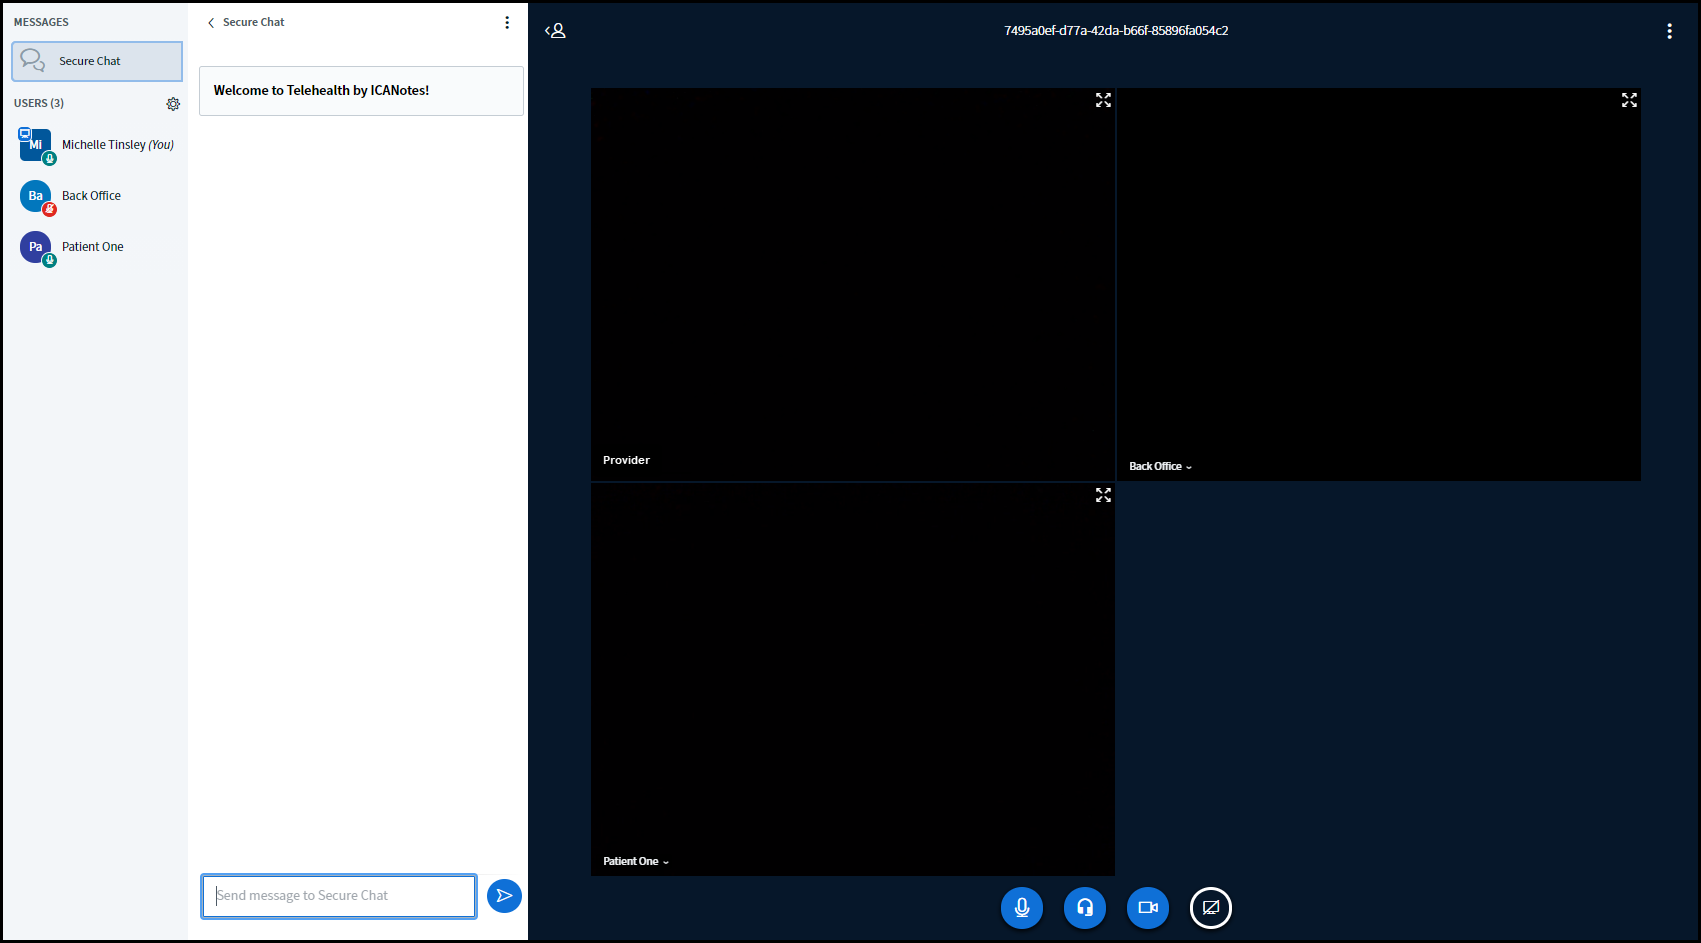
Communicating with Staff (o-r):
The Chat window located on the right-hand side of the Back Office is useful for communicating with other staff members currently logged in with their ICANotes credentials. To see who is online and available, click the Colleagues Online (o) button.
Doing so will cause a user panel to slide-out from the right side of the screen, displaying which staff members are currently online (denoted with the green checkmark) and which are offline (denoted with the red X).
You will need to close this panel by clicking on the Colleagues Online (o) button again to access the Back Office.
Upon logging into the Back Office, previous chat histories will not be available. The chat log is cleared once you log out. To save a copy of the internal chat log, click to Save Chat History (p) and a .txt file will download to your computer containing any text from the chat session.
Enter the text for the message you would like to send (q) and then click the Send button (r).
Inviting Additional Participants To Telehealth Sessions:
Users are now able to conduct a Telehealth session and invite more than one participant. The additional participants will need to be invited to the session once the session has been initiated, and the invitation has been sent to the first participant. There are also some additional options that allow providers to control if the patients can see each other's cameras or even if they can see the names of who else is in the session.
When you are logged in to the Back Office and have invited a patient to a Telehealth Session, you will have a new option that will allow you to 'Invite Participant'.
Click on the blue button with 3 vertical dots to access this option

Click 'Invite Participant'.
Enter the patient's First Name, Last Name and the method you would like to invite them, Cell or Email and click on the corresponding blue 'Invite Patient via' button.
Newly added patients will be nested under the first patient invited.

Click the '-' to hide the nested patients. The '-' will become a '+' and allow you to see all participants again.

All three participants in this session are able to share their cameras and audio.
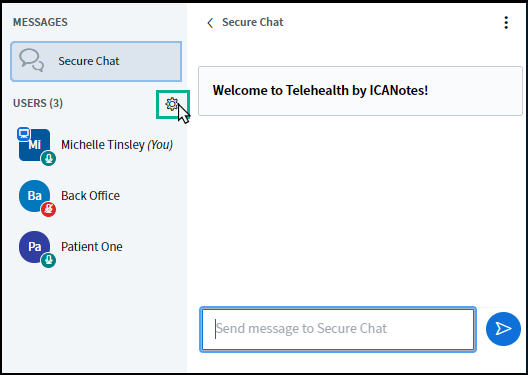
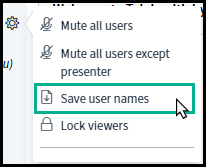
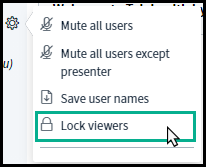
Within the session, the provider can access additional settings by clicking on the Settings gear icon.
There are options to Mute all users or Mute all users except presenter.
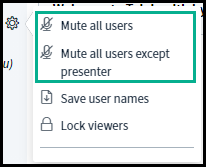
Save Usernames will allow the provider to save the names of the users to a file on their computer.
Lock Viewers will allow the provider to control what the participants for the group can see.
The provider will have options to either allow or prevent the following for participants.
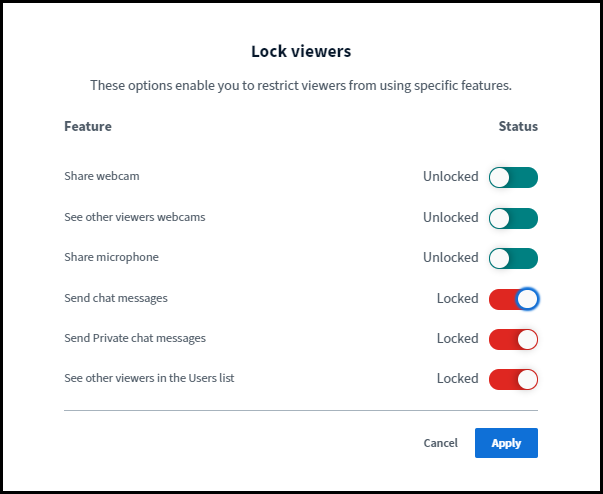
The top three permissions are shown above in the Unlocked or On position, indicating these actions are allowed. The bottom three are in the Locked or Off position, indicating that these actions are not allowed.
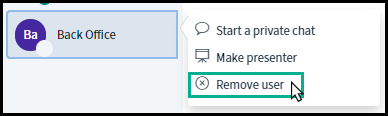
To remove an individual participant from the session, click the participant's name. This will populate a menu that will allow you to Start a private chat, Make Presenter or Remove user.
To end the meeting for all users, at the top right, the user can click on the 3 vertical does and select End Meeting.
Frequently Asked Questions
If I have already download and have been using the ICANotes Telehealth receiver application, can I still use that in conjunction with the Back Office?
No, at this time it's one or the other. Groups who are enabled for the Back Office environment will use the site for all telehealth services, and may cease using the external application.
Which browser should I be using to use the Back Office?
At this time, the Browser Based Back Office supports Google Chrome. Additional browsers will be supported in future updates.
Can a staff member send a telehealth invite on behalf of a provider if they are utilizing the Back Office?
Yes! Staff members have the option of sending telehealth invites via the traditional method from within the ICANotes application, or via the QuickVite or External Join links available through the Back Office.
Can I send an invitation from within ICANotes?
Yes, you can! You can send an invitation from the Chart Room, the Chart Face of the Event Details within the Calendar.
What if I don't see those invitation options?
In order to populate the invitation options, you will need to click on the Telehealth button located in the Options tab in Settings & Directories.
How can I tell when a telehealth session has been sent to the client/patient?
Once the invitation has been generated and sent, the client's name will appear within the Back Office Waiting Room window. Once the client arrives in the session, their session will be indicated with a green checkmark in the Waiting Room section.
Do staff members need to be activated for ICANotes Telehealth, or can anyone with credentials in my group login to the Back Office?
Staff members must be enabled for telehealth, by a Security Administrator in the Security Center, in order for their credentials to work logging into the Back Office.
Is the External Join Link safe to give to my clients?
Absolutely! The External Join Link is specific to your practice, and is completely unique from every other practice. Security features are implemented behind the scenes to ensure clients are accessing your practice. Just be aware that for reporting purposes within the Back Office, clients who join telehealth sessions via the external link or via QuickVite will not have their chart ID in ICANotes tied to the session. Only telehealth session invitations sent from within the EHR will have the session tied to the client's specific Chart ID in ICANotes.
What is the difference between "Leave Room" and "End Session"?
The "Leave Room" option will cause the staff member or provider to leave the client's telehealth session, but will not terminate the session from the client's side. This is an ideal use for staff members communicating with clients before the provider enters the session. Leaving the Room will enable the provider to later enter the session to conduct the telehealth session.
The "End Session" feature, by contrast, will terminate the session from both the ICANotes and client/patient side. This will disconnect the client from their telehealth session, and a new invitation would need to be sent in order for the client to re-enter the virtual waiting room for a telehealth session. Staff members checking in on clients prior to their telehealth session should avoid choosing the "End Session" option, as this would preclude the provider from entering and conducting a telehealth session without first creating a brand new invitation.
Can Back Office be accessed on an iPad?
Providers, staff members and clients are able to log in to Browser Based Back Office on an iPad.
Why can’t others hear me?
If others in the voice conference don’t hear you when you speak, it’s likely that the browser has picked the wrong microphone on your computer. You can click the phone icon twice – once to leave and a second time to rejoin – to try joining the audio again. When you see the echo test, if you can’t hear yourself, click “no” and select a different microphone.
If you can't hear or see your patient, ask them to check their on-screen buttons for audio and video. Blue buttons indicate the feature is enabled and in use, while white buttons indicate the feature is disabled.
If your patient is saying they can't see or hear you, check your session to make sure your audio/video is enabled. Click into Settings to check your Data Savings options. 'Enable webcams' should be enabled.
Why is there an echo?
We always recommend that you have your remote users use a headset with microphone. This will ensure the best audio in a session.
If one remote user (you or your patient) is using a laptop with a built-in microphone, you should not hear an echo. However, if two remote users (you & your patient) are using laptops with built-in microphones and neither is using a headset and both are sitting close to each other (close enough for the microphone in one laptop to pick up the audio from the speakers in the other laptop), then you will hear an echo. The reason is the built-in echo cancellation only works with the audio coming from the host laptop – the audio coming from the second laptop will be picked up as an external audio source.
How do I get the best audio?
Use FireFox or Chrome. Both these browsers support web real-time communications (WebRTC) audio.
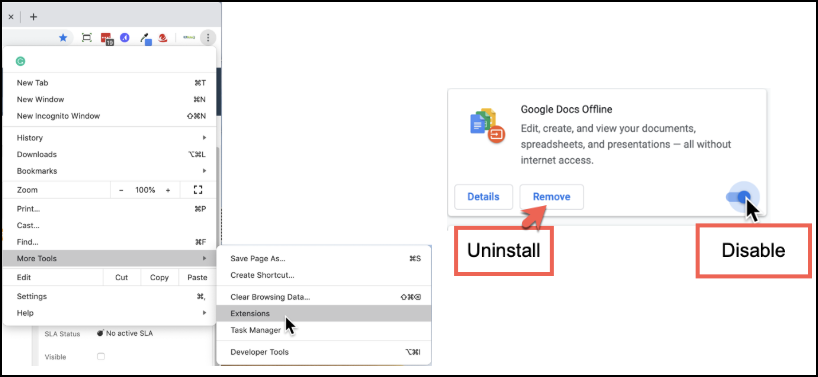
How are browser extensions uninstalled?
In Chrome, click the menu button at the top-right corner of the window, point to “More tools,” and select “Extensions.” Chrome will display your list of installed extensions. Scroll through the list and click the trash can icon to the right of any extensions you want to uninstall. You can also just uncheck the “Enabled” box to temporarily disable an extension without uninstalling it. You won’t have to restart your browser after uninstalling or disabling extensions.
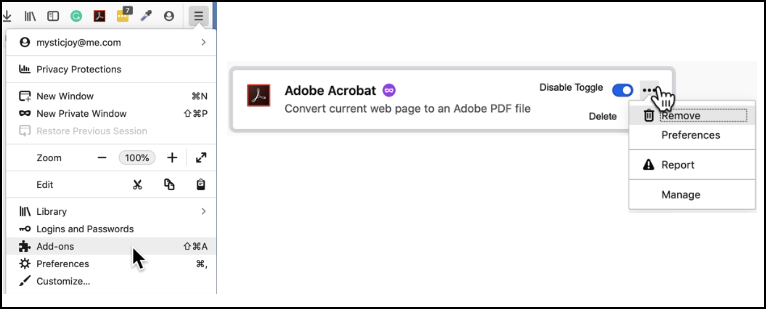
In Firefox, click the “Menu” button in the upper right corner and then click the “Add-ons” button to go directly to your list of installed Firefox add-ons. Click the puzzle piece icon on the left side of the page to view your browser extensions. From here, you can right-click an extension to uninstall it from your browser or temporarily disable it. If you see a “Restart Now” link, you’ll need to restart Firefox to finish the uninstallation process.
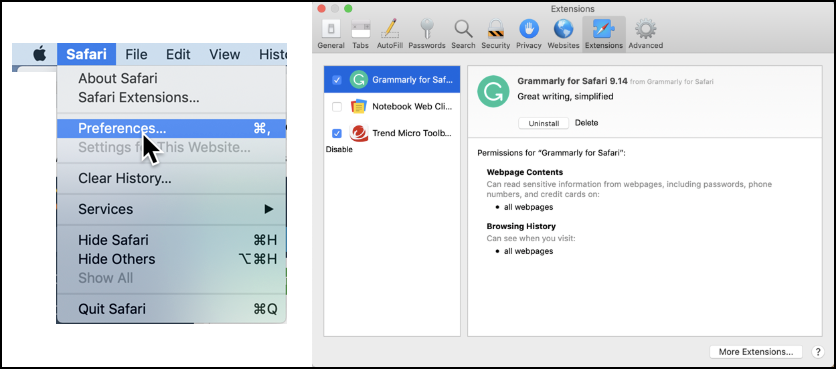
To manage your list of installed browser extensions in Safari, click the “Safari” menu at the top of your Mac’s desktop and select “Preferences.” Don’t click “Safari Extensions”–that’ll just take you to Apple’s Safari Extensions Gallery website you can download more extensions. Click the “Extensions” icon at the top of the Preferences window to see your list of installed extensions. Select an extension at the left side of the screen and either click the “Uninstall” button to remove it from your Mac or uncheck the “Enable [Extension Name]” box to disable the extension without removing it entirely.
My patient tried to open their telehealth session with an incompatible device/browser. How can I help them?
Links are valid for 5 clicks or 1 hour. Simply have them close the session they are having difficulty with and either click the link from a compatible device or paste the link into a compatible browser’s address bar.
My patient tried to upload a document, but I didn’t get it. What do I do?
File transfers are not currently supported. Please have the patient send you the file using another method - if you already use our patient portal, we strongly encourage this method of file transfer!
My patient says they can’t see me because the presentation window is huge. How do I close it?
This is known behavior at this time. We recommend having the patient close the session and re-join using their telehealth session link.
My patient didn’t receive the email or text message containing their session link. How can I resend it to them?
There is no way to resend the same session link a second time. You will need to end the session from the provider receiver app and start a new session to send them a new link.
Delays in receiving email or text messages isn't uncommon, but if your client is still reporting they've not received the session invitation, there are a few places to check first.
Email - Verify with the client the email address listed in Demographics is correct. Have the client check their spam folder, in case the message was mistakenly labelled as spam or trash. If the notification is not in spam, the client should try refreshing their email (if in a browser) or logging out and back in to refresh their inbox.
Text - Verify with the client the mobile phone number listed in Demographics is correct. A number of factors can contribute to a delay in receiving text messages, such as issues with the carrier (i.e., Verizon, Sprint, AT&T, etc). Some phones (such as the iPhone) have the ability to separate text messages from 'unknown senders' into a separate folder. If the client has this feature enabled, they should check to make certain the invitation wasn't misfiled.
Is the telehealth video session HIPAA compliant?
Yes, ICANotes Telehealth is HIPAA compliant and a secure, fully-featured and comprehensive behavioral health telemedicine application.