Overview
ICANotes+ enables you to create a Primary Care Note. Like other notes, you can use shrubs to capture content efficiently. You can also document service codes, diagnosis codes, prescribe medications, and record risk factors, medical history, and more. Each of these features is explained in detail in this knowledge base article.
After completing the note, you can compile it. Once compiled, the note can be electronically signed, printed, or downloaded.
The Primary Care Note feature is currently available exclusively for prescribers.
Accessing Primary Care Note
To create a Primary Care Note:
Go to the Chart Room.
Select a client.
Open the Chart Face tab.
Click the Primary Care Note button.
Creating Shrub Content for Primary Care
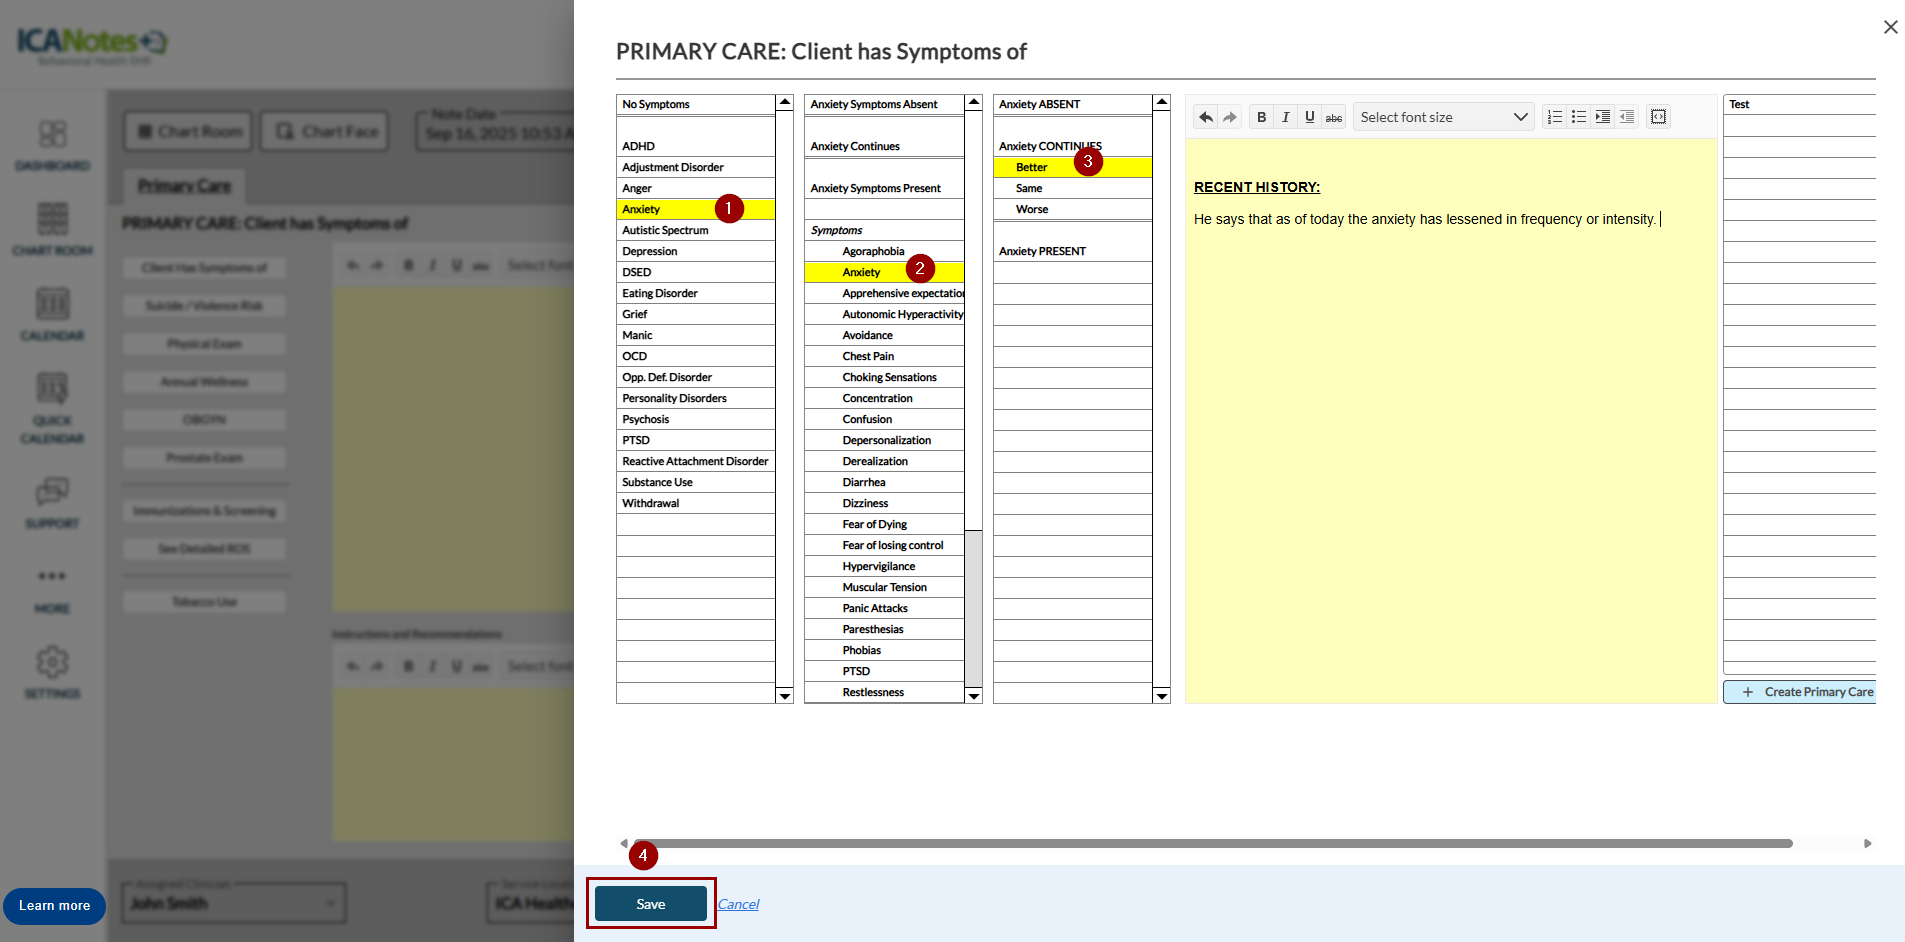
Use the Primary Care buttons in the left pane to create shrub content.
Clicking a button opens a slide-out panel where you can record the relevant symptoms or information.
Once saved, the content is added to the shrub.
The following buttons are available in the Primary Care note:
- Client Has Symptoms of
- Suicide / Violence Risk
- Physical Exam
- Annual Wellness
- OBGYN
- Prostate Exam
- Immunizations & Screening
- See Detailed ROS
- Tobacco Use
- Rating Scales
- Mental Status Exam
- Appearance
- Vital Signs
Select symtoms on the slide-out and click Save.
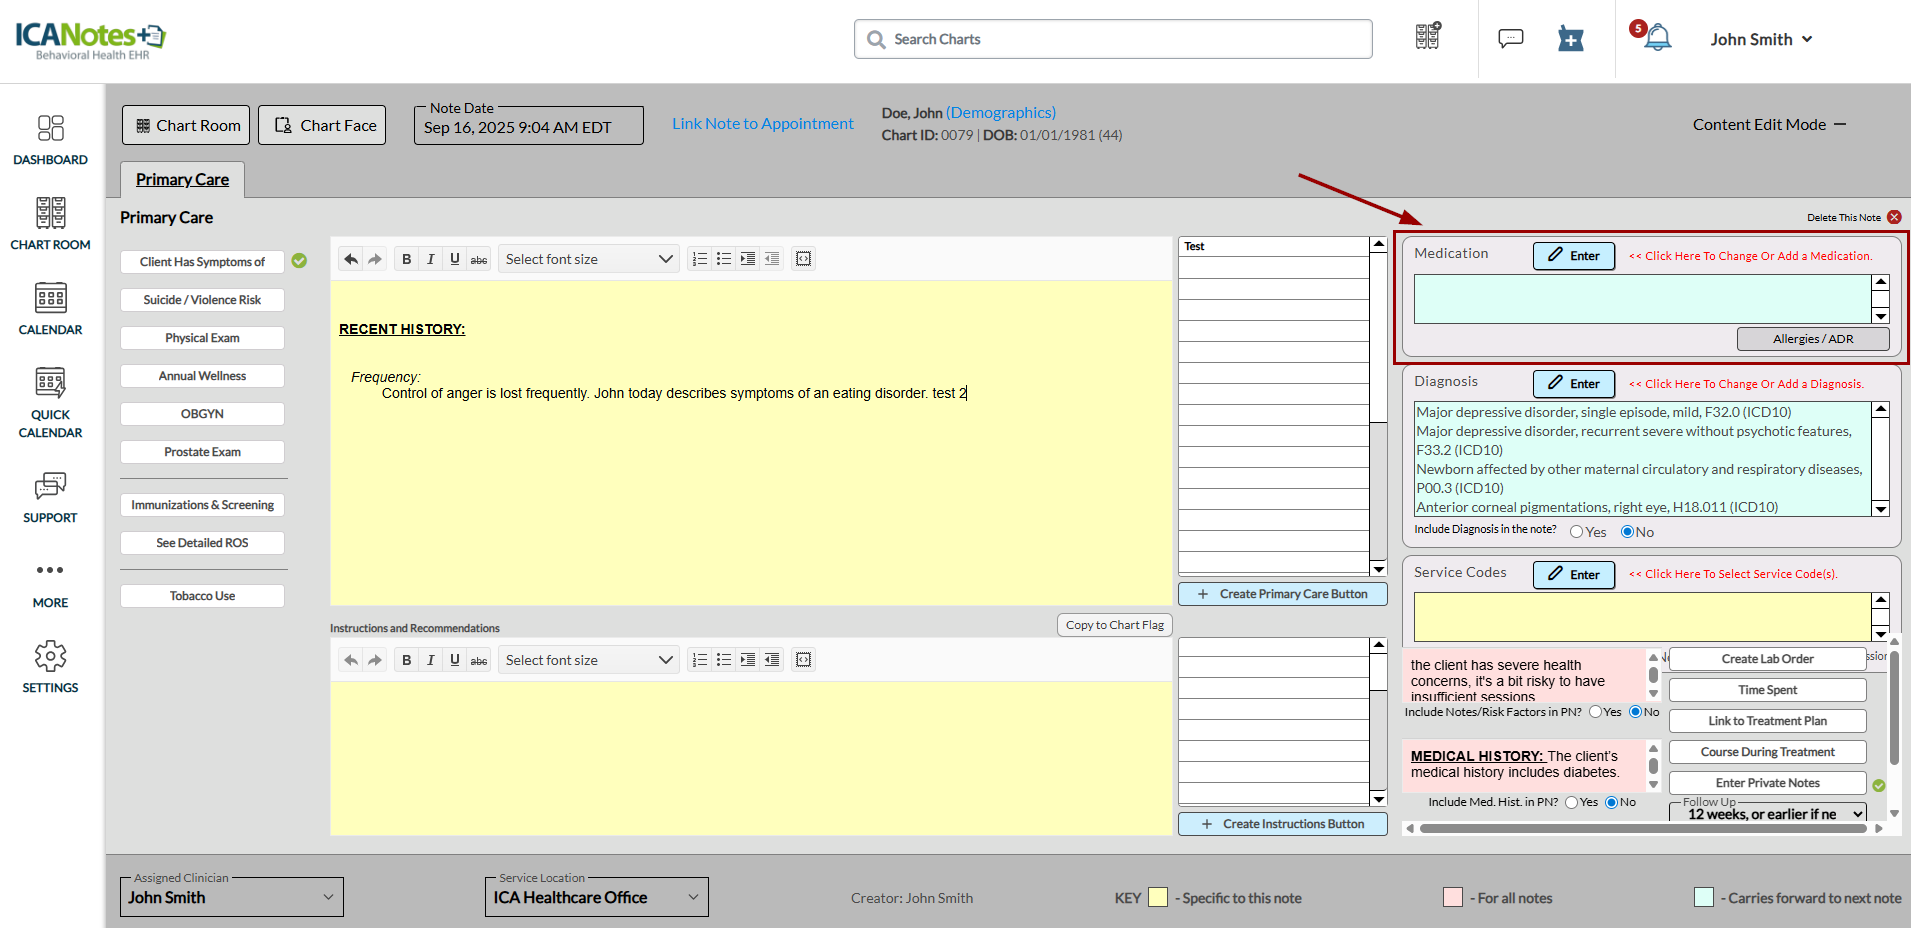
Recording Diagnosis Codes
In the Primary Care Note, you can record diagnosis codes (ICD-10). The Diagnosis box is located below the Medication box. In the Diagnosis box, you’ll see the option “Include Diagnosis in the note?” Select No if you don’t want the diagnosis code to appear in the compiled note. Providers can also set a default preference to automatically include or exclude diagnosis codes in the compiled note from their personal preferences.
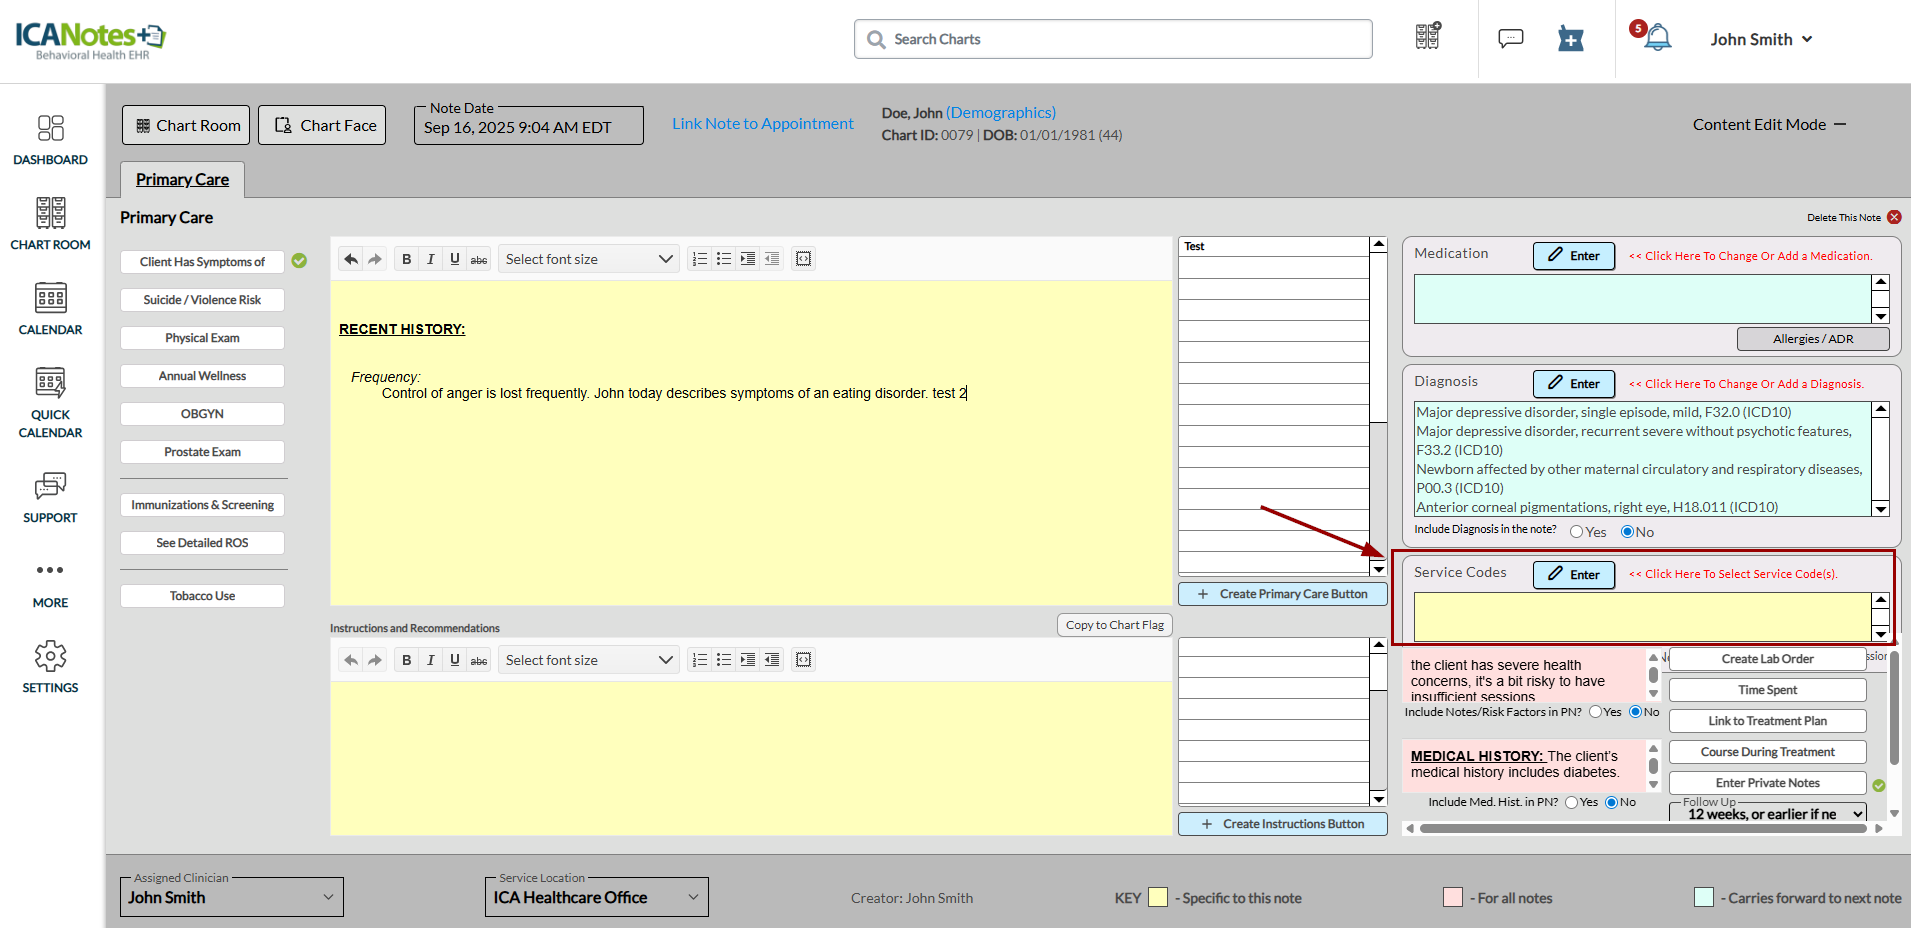
Recording Service Code
The Primary Care Note allows you to record service codes. The Service Codes box appears beneath the Diagnosis box. In the Service Codes box, you’ll see the option “Include Service Codes in the note?” Select No if you don’t want the service code to appear in the compiled note. Providers can also set a default preference to automatically include or exclude service codes in the compiled note from their personal preferences.
Recording Risk Factors and Medical History
You can record client risk factors and medical history in the Primary Care Note. These details appear in all notes (past and future). In the respective boxes, you will see the questions “Include Risk Factors in the note?” and “Include Med History in the note?” Select No if you do not want this information to appear in the compiled note. Providers can also set a default preference to automatically include or exclude risk factors and medical history in the compiled note from their personal preferences.
Recording Time Spent with the Client
Use the Time Spent button to record the duration of a client session. Clicking this button opens a modal where you can enter the session’s start and end times. The recorded times appear in the compiled note.
- Start: Enter the session start time.
- End: Enter the session end time.
Entering a start time automatically sets the note time to match.
Linking Note to a Treatment Plan
You can link a primary care note to an existing treatment plan for a client. The Link to Treatment Plan option lets you select the appropriate plan—either general or chemical dependency. When you link the note, the content is added to the Instructions and Recommendations section of the note. You can also copy this content into a chart flag message if needed.
Clicking Link to Treatment Plan opens a screen where you can choose the desired options from the dropdown list. The linked plan is then displayed in the right pane.
Once linked, the treatment plan appears in the Instructions and Recommendations section of the note.
To copy the linked treatment plan into a chart flag, select Copy to Chart Flag.
The chart flag message remains accessible at any time from the client ribbon by selecting the flag icon at the top of the screen.
Recording Course During Treatment
The Course During Treatment field is used to document details about the client’s course of treatment. Information entered here is for reference only and does not appear in the compiled note.
Selecting the Course During Treatment button opens a screen where you can enter your notes. These entries remain internal and will not display in the compiled note.
To add a new entry for today’s date, select Enter New Note Date and Divider. This separates your latest note from previous entries for easier tracking.
A green check mark appears next to the Course During Treatment button to show that the field contains content.
Entering Private Notes
The Private Notes field is used to record information intended for the clinician’s reference only.
Content entered here:
Does not appear on compiled or printed notes.
Is not considered part of the official client record.
May still be accessed if requested through a legal subpoena.
Selecting the Private Notes button opens a screen where you can enter your notes.
To add a new entry for today’s date, select Enter New Note Date and Divider. This separates your most recent note from older entries.
A green check mark appears next to the Private Notes button to show that the field contains content.
Recording Follow-up Details
Use the Follow-Up dropdown to select the desired timeframe for scheduling a follow-up visit for the client.
The dropdown offers several options, such as One Month or Earlier, One Week or Earlier, and others. Select the appropriate option for the follow-up. The chosen follow-up information will appear in the compiled note.
In addition to the existing shrub, you can create custom buttons to include in your shrub content. Each custom button can have up to three variations. When you click the Create Primary Care button, the system randomly selects one of the variations for use in the note.
Clicking the Create Primary Care button opens the setup screen.
- Step 1: Enter the button name as it should appear on the note for selection.
- Step 2: Enter up to three variations for the button; the system will randomly use one of them when the button is clicked.
You can also create custom buttons for instructions, which will appear in the Instructions and Recommendations section.
Compiling Primary Care Note
After entering all details in the primary care note, click the Compile and Preview button at the bottom right.
Once compiled, the note appears as shown below. From this view, you can:
- Download the note
- Print the note
- Copy note content
- Electronically sign the note
- Navigate to the chart face
- Access work areas
- Generate an invoice
- Create a Discharge Summary
- Create a Clinical Summary
FAQs
You can find the Frequently Asked Questions (FAQs) on our Knowledge Base page.
Need Help?
Proprietary Notice Information: This article is provided for informational purposes only, and the information herein is subject to change without notice. While every effort has been made to ensure that the information contained within this article is accurate, ICANotes cannot and does not accept any type of liability for errors in, or omissions arising from the use of this information.
Related Articles
Creating a Note from an Appointment
Overview When you schedule an appointment from the Calendar, you can create a note directly from that appointment. Creating the note at the time of scheduling automatically links it to the appointment, helping streamline your documentation workflow. ...
How to Document an Episode of Care
The Chart Face section displays information relating to the client’s current episode of care. Each created chart contains a new episode of care. Click the pencil icon to the right of the screen to make changes to the current episode of care. The Edit ...
Readability Enhancer: Use AI to Improve Your Note Content
Overview The Readability Enhancer feature in ICANotes+ uses artificial intelligence (AI) to help improve the clarity and professionalism of your note content. You can refine the entire note or enhance specific sections based on your needs. ⚠️ ...
Practice Note Settings
Overview This guide covers the workflow for practice owners customizing note settings at the group level in ICANotes. Navigate to Note Settings From the left-hand navigation menu, go to Settings Click into the Note Settings section. Here you can ...
Configure Default Note Settings
Overview On the client’s chart face, multiple note types are available, such as Progress Note, SOAP Note, and Quick Note. You can prioritize the note type you use most frequently for quicker access. For example, if you regularly create Progress ...